Thursday, February 15, 2007

Advanced-Death Blossom

Death Blossom (a.k.a. Aligned ALS Exclusion)
This strategy is based on extending Aligned Pair Exclusion but uses Almost Locked Sets to make some clever reductions. From the components used it could be named Aligned ALS Exclusion but Mike Barker, who formulated it first in this thread, hit on "Death Blossom" because it starts with a cell designated as the "stem" which points to Almost Locked Sets, or the "petals", and is a great deal more flowery.


An Almost Locked Set is any group of N cells (that can all see each other) with N+1 candidates between them . This includes bi-value cells. A Locked Set, by contrast, contains exactly the right number of canidates for the group, examples of which are Naked Pairs and Triples.
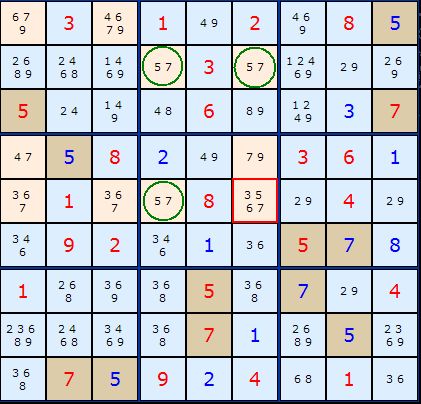
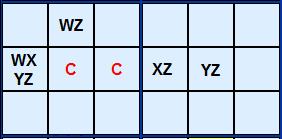
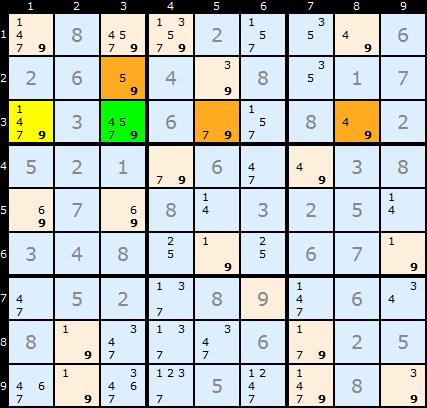
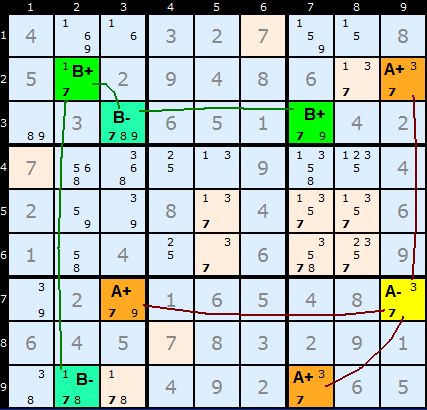
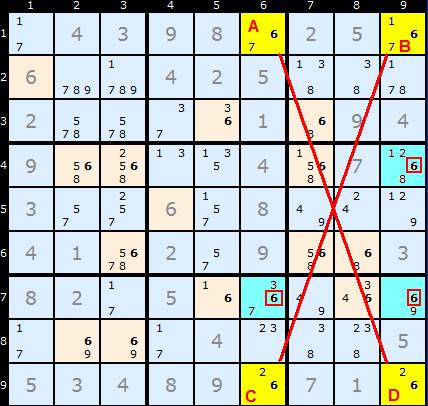
To get a feel for what’s going it worth working backwards from the elimination of 1 in E1 in this first example. We have two Almost Locked Sets {D2,F2,H2} and {E5,E8,E9} and they both have 1 as a common number between them. If E1 did have 1 as a solution it would reduce the first Almost Locked Set to a Naked Pair with 2/4 forcing H2 to be 8. The second ALS would also reduce to a Naked Pair of 7/9 forcing E9 to be 2. If E9 is 2 and H2 is 8 then the stem cell (coloured green) H9 is left with nothing. This confirms that E1 is not 1.
If we work forwards from the “stem” cell we’ll get closer to a formula for finding this formation. H9 with {2/8} must be able to see at least two ALSs which contain all its candidates. It is important that the 2 in H9 can see all of the 2’s in the brown coloured ALS (one instance in this case) and 8 in H9 can see all of the 8’s in the yellow coloured ALS (also one in this instance). But H9 overall does not have to see every single cell in all the ALSs, just the cells it shares candidates with.


Now, the two ALSs must have a candidate Z in common which the "stem" cell does not have. Because ALSs contain exactly one extra candidate for the number of cells they occupy (the N+1 candidates for N cells rule), we can assert that ANY cell that can see all the Zs in both ALS but is not part of those ALSs or the stem cell can be removed. Such a cell is E1.
Death Blossom was discovered by extending Aligned Pair Exclusion (APE) and asking if there was generalization beyond the pairs and triples discussed in Aligned Pair Exclusion. With Almost Locked Sets there is. The stem cell H9 and the elimination cell E1 can’t see each other – they not aligned, but the pairs they can make do affect the board. In our example, consider the pairs that can be made between the 1 in E1 and the 2/8 in H9. These are 1/2 and 1/8 in E1 and H9 respectively. Both these turn out to be illegal since they would reduce our ALSs to having less candidates than cells. So whatever the solutions to the two disparate cells E1 and H9, E1 will never contain a 1.

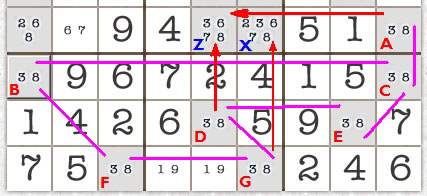
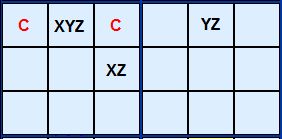
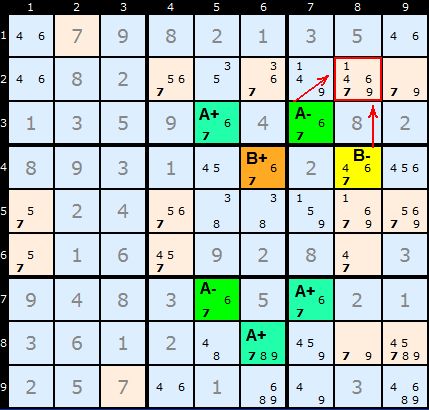
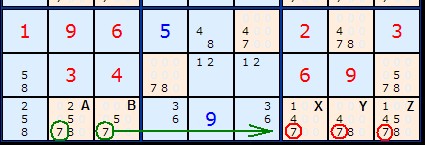
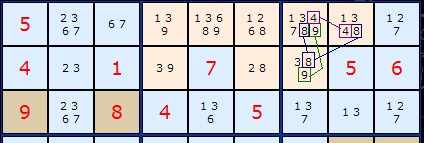
In Figure 2 quite a different arrangement is apparent but the logic is identical. The two yellow coloured cells form a two-cell ALS with the values {1/2/8}. At the bottom there is a four-cell ALS with {3/4/7/8/9}. Our stem cell again contains only two candidates {1/4} (coloured green) but don't think this is a restriction. There could be five or six numbers in the stem cell. As long as there are sufficient Almost Locked Sets that the candidates can see then the pattern can be made to work.
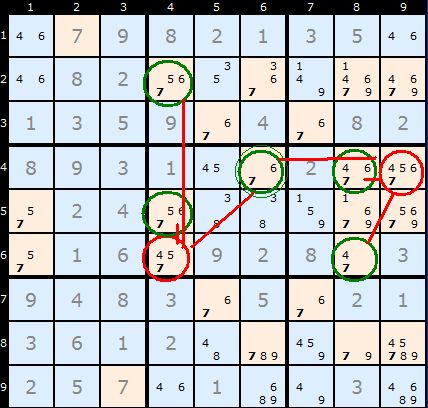
There is another way to look at this example which mirrors some strategies already covered. Starting in H8
If H8 is 1 -> B8=2 -> B2=8 therefore A3,B3,C3,J2 <> 8
If H8 is 4 -> H1=7 -> H2=9 -> H3=3 -> J3=8 therefore A3,B3,C3,J2 <> 8


When traced through in this manner Death Blossom doesn’t seem so daunting.


Go To : Basic Fishy Advanced


Go To : Sudoku solving techniques

Advanced-Guardians


This strategy works with single numbers. We've already used closed loops of conjugate pairs to find things like X-Wings and Sword-Fish. X-Wings contains 4 cells in a perfect rectangle. Sword-Fish requires 6 or 9 cells in a grid. This strategy works with odd numbers of pairs in a loop starting with 5. There are several varieties depending on how 'perfect' the loop is.
Let us use the words perfect pair instead of conjugate pair to mean any number that exists only twice in one unit (row, column or box). This means we can use imperfect to mean a number that occurs three or more times in a unit. (Obviously if it only occurred once it would solve that cell).


In Figure 1 we have highlighted the number 3. Amongst all the candidate threes is a loop of five 3's. They form four perfect pairs:R5C7 - R5C5 - along the rowR5C5 - R7C5 - along the columnR7C5 - R7C9 - along the rowR7C9 - R4C9 - along the columnTo close the loop we have an imperfect triplet in the sixth box. The question is: can a closed loop of five candidate cells be constructed with each cell perfectly-paired in two ways with the next linking cells in the loop? The answer is no. Such a formation is impossible in a Sudoku puzzle. In such a loop, if you "placed" a candidate in any one of the cells and followed the consequences around the loop, you'd generate an automatic contradiction - forcing the number to disappear entirely from a row, cell or block, or to appear twice in a single line or block, depending on how you proceed.

To repeat, In an actual Sudoku there can never be a closed loop of five perfectly paired cells. And that is exactly where the solving technique lies. Any such structure must have one or more cells that disrupt the perfect pairings. We can refer to the cells which prevent one of the pairings from being perfect as guardians. Here's the trick: logically, one or more of the guardians must contain the candidate number. If none of the guardian cells were real, then the pairings would all be perfect and, as was already noted, that is flat-out impossible in a valid Sudoku. Accordingly, we can make the following assertions:
If there is only one guardian cell, the candidate number can be installed in that cell.
If there is more than one guardian, any cell that is seen by all the guardian cells cannot contain the candidate number; hence
If all the guardian cells are in a single column, row or block of the Broken Wing, the candidate can be erased from both the Broken Wing cells in that column, row or block. Type 1 - Single Guardians The variants of this strategy depend on how many Imperfect connections there are in the loop. To achieve one guardian there must be four perfect pairs and one Imperfect connection. Figure 1 illustrates this. That one guardian is the cell that disrupts the 5-loop from being perfect.


Type 2 - Double Guardians


In Figure 2 we have highlighted the number 7. Amongst all the candidate 7's is a loop of five 7's. There are two imperfect connections in the loop:R8C3 - R8C9 - along the rowR8C3 - R7C2 - within the boxThis gives us two guardian 7's in R7C1 and R8C7 marked in red squares. Whatever cells these two can both 'see' we can eliminate the 7 from them. Since in this example they form the opposite corners of a rectangle we can safely remove the 7 from R7C7 marked in a red circle. The other corner, R8C1, contains a solved square. Solving R7C7 allows us to complete the puzzle using other strategies.


Type 3 - Disruptive Guardians

In Figure 3 we have highlighted the number 1. Amongst all the candidate 1's is a loop of five 1's. There are two imperfect connections in the loop:R2C4 - R7C4 - along the columnR7C4 - R7C7 - along the rowThis gives us two guardian 1's in R3C4 and R7C6 marked in red squares. Whatever cells these two can both 'see' we can eliminate the 1 from them. Like in the example above, they form the opposite corners of a rectangle but the difference is that we're eliminating a 1 that's actually part of the loop. This is perfectly legitimate and follows from Rule 3 described above. The elimination occurs because R7C4 can be seen by both guardians.


Go To : Basic ||Fishy || Advanced


Go To : Sudoku solving techniques

Sunday, February 11, 2007

Advanced- Unique Rectangles

Unique Rectangles
Unique Rectangles takes advantage of the fact that published Sudokus have only one solution. If your Sudoku source does not guarantee this then this strategy will not work. But it is very powerful and there are quite a few interesting variants.

Noticing the 'Deadly Pattern'
In Figure 1 we have two example rectangles formed by four cells each. The pattern in red marked A consists of four conjugate pairs of 4/5. They reside on two rows, two columns and two blocks. Such a group of four pairs is impossible in a Sudoku with one solution. The reason? Pick any cell with 4/5. If the cell solution was 4 then we quickly know what the other three cells are. But it would be equally possible to have 5 in that cell and the others would be the reverse. There are two solutions to any Sudoku with this deadly pattern. If you have achieved this state in your solution something has gone wrong. The pattern ringed in green looks like a deadly pattern but there is a crucial difference. The 7/9 still resides on two rows and two columns, but instead if two boxes it is spread over four boxes. Now, such a situation is fine since you can't guarantee that swapping the 7 and 9 in an alternate manner will produce two valid Sudokus. One of them is the real solution, the other a mess. Why? Swapping the 7 and 9 around places them in different boxes and 1 to 9 must exist in each box only once. In the red example, swapping within the box does not change the content of that box.


Type 1 Unique Rectangles
Figure 1
For all Unique Rectangles we are going to look for potential deadly patterns and take advantage of them. A Type 1 Unique Rectangle is illustrated in Figure 2. The three circles marked in green rings contain 5/7. The fourth corner marked with a red square also contains 5/7 and two other candidates. If the 3/6 were removed from that cell we would have a Deadly Pattern. This cannot be allowed to happen so its safe to remove 5 and 7 from that cell. The proof is pretty straightforward once you get your head around the basic idea. Assume R5C6 is 5. That forces R5C4 to be 7, R2C6 to be 7, and R2C4 to be 5. That's the deadly pattern; you can swap the 5's and 7's and the puzzle still can be filled in. So if the Sudoku is valid, R5C6 cannot be 5. The exact same logic applies if you assume R5C6 is 7. So R5C6 can't be a 5, and can't be a 7 - it must be either 3 or 6.


Type 2 Unique Rectangles
In Figure 3 we have a similar pattern, but this time, R2C4 and R2C6 (green circles at the top), the squares which share the same block have a single extra possibility - in this case, 8. To make subsequent discussion easier to follow, we will refer to the two squares that only have two possibilities as the floor squares (because they form the foundation of the Unique Rectangle); the other two squares, with extra possibilities shall be called the roof squares.
In this "Type-2 Unique Rectangle", one of the blocks contains the floor squares, and the other contains the roof squares. In order to avoid the deadly pattern, 8 must appear in either R2C4 or R2C6 (the roof squares). Therefore, it can be removed from all other squares in the units (row, column and box) that contain both of the roof squares (in this case, row 2 and block 2). Now that you've gotten your head around the basic unique rectangle concept, the proof should be pretty obvious:
If neither R2C4 or R2C6 contains an 8, then they both become squares with possibilities 2/9. This results in the deadly pattern - so one of those squares must be the 8, and none of the other squares in the intersecting units can contain the 8. So R2C3, R3C4 and R3C6 can have 8 removed. This cracks the Sudoku.


Type 2B Unique Rectangles

There is a second variant of Type-2 Unique Rectangles as illustrated In Figure 4. In this puzzle, we have the same pattern of 4 squares in 2 blocks, 2 rows and 2 columns. The floor squares are R1C1 and R1C9, and the roof squares are R2C1 and R2C9. However, in this Unique Rectangle, each of the blocks contains one floor and one roof square. This is perfectly fine, but it means that the only unit (row/column/box) that contains both of the roof squares is row 2, so that is the only unit that you can attempt to reduce; in this case, R2C7 cannot contain a 8. This is called at "Type-2B Unique Rectangle".

Type 3 Unique Rectangles - Cracking the Rectangle with Conjugate Pairs
An interesting observation is that it is sometimes possible to remove one of the original pair of possibilities from the roof squares. Consider the following puzzle in Figure 5.
Look closely at the roof squares, R3C1 and R3C3, but this time, don't look at their extra possibilities; look at the possibilities they share with the floor squares. If you look carefully, you'll see that in box 1, the roof squares are the only squares that can contain a 5. This means that, no matter what, one of those squares must be 5 - and from this you can conclude that neither of the squares can contain a 1, since this would create the "deadly pattern"! So you can remove 1 from R3C1 and R3C3.
Nomenclature: When two squares are the only two squares in a unit that can have a particular value, they are referred to as a conjugate pair on that value.
This is an example of a "Type-3 Unique Rectangle". As you have probably realized, since the roof squares are in the same block, you can search for conjugate pairs in both of their common units (the row and the block, in this case).


Type 3B Unique Rectangles
And, as you might expect, there is a Type-3B Unique Rectangle variant, in which the floor squares are not in the same block, and you can only look for the conjugate pair in their common row or column. For example: In this case, since 7 can only appear in row 4 in the roof squares, 5 can be removed from both of them.
As Type-4 Unique Rectangle solutions "destroy" the Unique Rectangle, it is usually best to look for them only after you've done any other possible Unique Rectangle reductions.


Go To : Basic ||Fishy || Advanced
Go To : Sudoku solving techniques

Advanced-Remote Pairs

Remote Pairs
I've coined Remote Pairs to distinguish this new strategy/test/check, whatever, from the simpler more obvious pairs. Since first writing about it the strategy has been expanded in several directions and is more common than first thought. Pairs occur where two or more squares have the same two possible numbers. A locked pair is two such squares which lock each other in. For example, in the diagram on the right in the top row: 6 and 9 occur twice (labelled A and B) as a pair on the same row. This means the number 6 and the number 9 MUST occur in both squares. We can therefore eliminate other 6s and 9s from the same row. Same rule applies to boxes and columns.

On the diagram on the right I have marked all locked pairs with a red line. These are AB, AC, BD, CD and DE. You can load and view the whole of this board from the main Sudoku page. Look for Remote Pair Test in the drop downlist of examples. The point of this test/strategy is that we want to eliminate the 9 from square Z and leave the 8. Can we do this logically, or must we guess? What about square X which also looks like a candidate for removing the 6 and 9?
To do this we must prove that A and E are themselves a locked pair. But how can we do this when they are not in the same row, column or box? We must also prove that B and E are NOT a locked pair, otherwise we'd have to remove the 6 and 9 from X as well. Visually we can see that if B is a 6 then D must be a nine so that E must be a 6. B and E are complementary pairs since they MUST have the same number, be it 6 or 9. Likewise A and D.
Consider Figure 1. We have five squares with the same pairs of numbers. Arranged in a pentagram as a network diagram each square has four links to every other square.I have drawn in red the links between locked pairs and ignored all other links. Let us say these links have a distance of 1 between the nodes.

Now, in figure 2, we map all the pathways of distance 2. Valid pathways must be along the routes defined in Figure 1. What we are mapping here is all the complementary pairs, and I've drawn the links green. Topologically there cannot be ANY red links matching two locked pairs with distance 2.

In figure 3, we are mapping all the possible pathways of distance 3. These paths represent connections between newly discovered locked pairs. There are only two possible paths in this example, and again they can only be between locked pairs at this distance.
If we had more nodes we could carry on like this and look for distance 4 paths representing new complementary pairs but distance 4 is not possible in this example.


However, we now know that we can show that AE is a locked pair if we can show that its minimum distance is an odd number (or distance mod 2 = 1 in arithmetical terms). They become a special locked pair I call a remote pair. Thus we may safely remove the 9 from Z. Because the distance between BE is an even number (2) we know we have a complementary pair and the information is useless for deciding the fate of X. Its important to remember numbers can be removed from any cell that both ends of the chain can see, so consider boxes as well as rows and columns.
Now the problem has been generalised we may proceed to code the rule into an algorithm. Test 9 on the solver page is the result.


Lets look at another example. This looks complicated because we have seven pairs (marked A,B,C,D,E,F and G). Our targets are X and Z which can be got at by an attack from AD and AG.

We would like to remove the 3 and 8 from Z and X. However, it is only safe to remove the numbers from Z. Why? Because AD is an odd number of locked pairs from each other (ACED or ACBFGD) . AG, whether you go via ACBFG or ACEDG are even numbers apart
A word of warning though. It is essential that the line of attack is supported by a contiguous line of locked pairs. In the example on the right we have four pairs of 3/4 at A,B,C and D. However, while AB is connected and so is CD, there is no connection between the two groups. Therefore the elimination of the 3/4s on Z and X are not legal or logical.


Go To : Basic ||Fishy || Advanced
Go To : Sudoku solving techniques

Saturday, February 10, 2007

Advanced-Aligned Pair Exclusion

Aligned Pair Exclusion (APE)
This is an interesting strategy since it overlaps with Y-Wings and XYZ-Wings but uses very different logic. APE logic will solve an XY-Wing (3 bi-values) and an XYZ-Wing (bi-value <-> tri-value <-> bi-value).There are two types of APE - the normal APE and Extended APE.
Aligned Pair Exclusion - Type 1

The Aligned Pair Exclusion can be succinctly stated: Any two cells aligned on a row or column within the same box CANNOT duplicate the contents of any two-candidate cell they both see. The Y-Wing strategy has some diagrams (see Figure 2) to show how cells can see other cells along the row, column or box and how they intersect or overlap. In Figure 1 X and Y are two cells and the yellow shading shows the common cells they can both 'see'.
Lets consider all the possible pairs of numbers in X and Y. These are:
3 and 2 (in X and Y)3 and 55 and 25 and 57 and 27 and 5

Now is obvious that 5 and 5 can't be a solution to X and Y. If any of the other pair solutions were true we'd be able to remove those solutions from the candidates in all the other yellow squares. The strategy asks us to look at all the bi-value cells X and Y can 'see'. Cells marked A, B and C containing 2/7 and 3/5 and 5/7 match some of the options we have for X and Y. Any of these pairs would remove ALL candidates from one of A, B or C which is illogical, captain. This means we can exclude them from possible solutions for X and Y. This leaves us with a shorter list: 3 and 2 (in X and Y)5 and 2
What are we left with? According to our new list Y can only take the value 2 so we can remove 5.We can also remove the 7 from X. This helps us solve the Sudoku.
Credits - Rod Hagglund first popularised this method. A good thread with a double example and walk-through is here


Aligned Pair Exclusion - Type 2
The Extended Aligned Pair Exclusion includes tri-values spread over two cells as part of the attack. APE 2 Says that any two cells with only abc excludes combinations ab, ac and bc from the pair under consideration. This example is very clear since the two-cell tri-value is convieniently 4/5/6 in both cells. (see next example for alternative tri-value formations).
Lets consider all the possible pairs of numbers in X and Y first. These are:
1 and 4 (in X and Y)1 and 61 and 84 and 4 (impossible)4 and 64 and 86 and 46 and 6 (impossible)6 and 8

Cell R5C6 marked C removes a 1/4 pair. Now the tri-value: These are 4/5, 4/6 and 5/6. Removing these from the possibles for X but Y leaves us:
1/4/6 remains in X but Y is reduced to 6/8. Why should this work? Well, 5 is not really part of the tri-value that effects our APE. The key combination is 4/6 and that does the damage. Pretend that X is 4 and Y is 6 (or the other way round). This would leave A and B both equalling 5. Thats illegal which is why 4/6 is a combination we can remove from possible pairs in X and Y.
1 and 6 (in X and Y)1 and 84 and 86 and 8


In this second example the tri-value contained in A and B is 2/7/8. The only common value is 2. Nevertheless, the abc combinations are 2/7, 2/8 or 7/8. All the possible pairs of numbers in X and Y are. 7 and 5 (in X and Y)7 and 98 and 58 and 78 and 9
Our one tri-value which matches these is 7/8. If we remove 7/8 from our list Y is reduced to 5 and 9. We get a naked pair and the rest of the Sudoku solves.

Advanced-Wxyz Wing

WXYZ-Wing (a.k.a. "Extended Quad")
This is an extension of XYZ-Wing that uses four cells instead of three. Each possible value of the hinge cell results in a Z value in one of the cells in the WXYZ-Wing pattern, thus leaving no room for a Z on any cell all four can 'see'.

Its name derives from the four numbers W, X, Y and Z that are required in the hinge. The outer cells in the formation will be Wz, XZ and YZ, Z being the common number.


In this example our four-value hinge is R3C3 marked in green. The three outlier cells, marked in orange each contain a 9 (our Z) plus one other number unique to themselves and the hinge. It's important that these extra numbers really are common only to the hinge and there are no pairs like 5/9 and 5/9 in two of the orange cells. There is only one cell that all four of the WXYZ can see - R3C1, marked in yellow. It has a 9 which can be removed. No matter what number is the final solution in the hinge, one of the WXYZ must be a 9.

Friday, February 09, 2007

Advanced-xyzWing

XYZ-Wing (a.k.a. "Hinge")
This is an extension of Y-Wing or (XY-Wing). John MacLeod defines one as three cells that contain only 3 different numbers between them, but which fall outside the confines of one row/column/box, with one of the cells (the 'apex' or 'hinge') being able to see the other two; those other two having only one number in common; and the apex having all three numbers as candidates. It follows therefore that one or other of the three cells must contain the common number; and hence any extraneous cell (there can only be two of them!) that "sees" all three cells of the Extended Trio cannot have that number as its true value.

It gets its name from the three numbers X, Y and Z that are required in the hinge. The outer cells in the formation will be XZ and YZ, Z being the common number.


In this example the candidate number is 7 and R3C5 is the Hinge. It can see a 1/7 in R2C4 and a 5/7 in R3C8. We can reason this way: If R2C4 contains a 1 then R3C5 and R3C8 become a naked pair of 5/7 - and the naked pair rule applies. Same with R3C8. If that's a 5 then R2C4 and R3C5 become a naked pair of 1/7 each. If any of the three are 7 then 7 is still part of the formation. Any 7 visible to all three cells must be removed, in this case in R3C6.
The second example shows a double XYZ-Wing. R4C6 is common to both XYZ-Wings.

Advanced-XY Chains

XY-Chains
The Y-Wing Chains are infact part of a more encompassing strategy called XY-Chains. The commonality is the same pincer-like attack on candidates that both ends can see and that the chain is made of bi-value cells. With Y-Chains the hinge was expanded to a chain of identical bi-value cells but in an XY-Chain these can be different - as long as there is one candidate to make all the links. The "X" and the "Y" in the name represent these two values in each chain link. The example here is a very simple XY-Chain of length 4 which removed all 5's in the pink cells. The chain ends are A7 and C2 - so all cells that can see both of these are under fire. It's possible to start at either end but lets follow the example from A7. We can reason as follows
1: If A7 is 5 then A3/C7/C9 cannot be. 2: if A7 is NOT 5 then it's 9, so A5 must be 2, which forces A1 to be 6. If A1 is 6 then C2 is 5.Which ever way round A7 is the 5's in A3/C7/C9 cannot be 5. The same logic can be traced from C3 to A7 so the strategy is bi-directional, in the jargon.

Here is a much longer seemingly more complex XY-Chain of length 10 - attacking 6's in the pink cells. I've shaded the two chain ends in green. I've also left the arrow head's off so you can trace the XY-Chain from either end. Doing so you'll quickly release that 6 must be at one end or the other, so there is no chance of other 6's which both ends can see.

When you've got a good spread of bi-values this is a useful trick. Remote Pairs, described below are also a special sub-set of XY-Chains - they merely have a double-chain of inference through both values in each chain link because they contain the same values from start to end. Remote Pairs were discovered/described first before this more general approach.

Thursday, February 08, 2007

Advanced-YChains

Y-Wing Chains
The Y-Wing strategy can be extended into chains. Remember, the Y-Wing consists of a pivot cell and two pincers. We keep the principle of the pincers exactly the same. The difference is that the pivot can be replaced by locked pairs. Our pivot chain for a y-Wing must proceed at odd numbered lengths. A Y-Wing is simply a chain with length = 1.

In Figure 1 we have a Y-Wing Chain marked our in green cells. The 5/7 pivot consists of three pairs of 5/7. The first 5/7 (in which ever order) is connected to the last 5/7 by a third 5/7 in the middle, and by definition this is a locked pair. If the first 5/7 is a 5 them the third one must be a 5 as well. Same goes for number 7.
Our pincer is based on the two green cells marked with a red border - the pairs 7/9 and 5/9. The principle of the Y-Wing says that any cells that both those can see we can eliminate the common number - in this case 9. The two cells marked with a red circle can be 'seen' by both and the 9 removed.

Wednesday, February 07, 2007

Advanced-Ywing

Y-Wing Strategy ( a.k.a XY-Wing )
This is an excellent candidate eliminator. The name derives from the fact that it looks like an X-Wing - but with three corners, not four. The forth corner is where the candidate can be removed but it leads us to much more as we'll see in a minute. Lets look at Figure 1 for the theory.
A, B and C are three different candidate numbers in a rectangular formation. In two corners an occurrence of A is shared with another number C. B also shares C. The cell marked AB is the key. If the solution to that cell turns out to be A then C will definitely occur in the lower left corner. If AB turns out to be B then C is certain to occur in the top right corner. C is a complementary pair.
So whatever happens, C is certain in one of those two cells marked C. The red C is can be 'seen' by both Cs - the cell is a confluence of both BC and AC. Its impossible for a C to live there and it can be removed.

In Figure 2 I'm demonstrating the sphere of influence two example cells have, marked red and blue. X can 'see' all the red cells, Z can 'see' all the blue ones. In this case there are two cells which overlap and these are 'seen' by both.


If our A, B and C are aligned more closely they can 'see' a great deal more cells than just the corner of the rectangle they make. In Figure 3 BC can see AB because they share the same box. AC can see AB because they share the same row. BC and AC can see all the cells marked with a red C where this Y-Wing can eliminate whatever number C is.

In this first example we have lots of 1s, 2s and 3s, but three cells - marked in green rings - form a Y-Wing. The two 2s on the end form the pincer - one of them must be a 2. Therefore the 2 marked in a red box can be eliminated.

The second example in Figure 5 shows three candidate 8s being eliminated from a single Y-Wing. The Y-Wing consists of 1/8, 1/5 and 5/8.

Advanced-Multicoloring

Multi-Colouring Strategy
There are two major types of Multi-colouring and neither are for the faint hearted. You'll need four coloured pencils ;-) Fortunately we are only scanning the board for single numbers in conjugate pairs. These occur where a candidate exists only twice in any row, colum or box (unit). We can chain these togther if there are sufficient numbers of them just as we did for simple colouring above. In Multi-Colouring we are looking for two or more chains. It is important they don't link up - three or more appearances of the candidate number in an intervening unit prevent the 'link up' of two chains.
Given two chains we can label them A and B. A+ and A- will indicate the alternating states so that EITHER all of A+ are true OR all of A- are true. We don't know which way round yet. Similarly B+ and B- indicate alternating true/false for that chain. C+ and C- continues the theme if there are more chains on the same candidate number. Give A+, A-, B+ and B- we can colour them on the board to see the patterns.
Type 1 Multi-Colouring
The Rule is as follows: If A+ shares a unit with B+ and B- then A+ must be the false candidate since either B+ or B- must be true.

In this Sudoku we've looking at number 7 and labelled two chains A and B and settled on the plus and minus symbols. I have labelled them so that they match the rule. (Don't make a category mistake and think the rule applies just because you've assigned the lables!).
Now the yellow cell marked A- does not share a unit with and B. However, all three cells marked A+ can see a B+ or a B- in one or more shared units. Since the solution cannot be both B+ and B- every cell in A+ must be false and number 7 can be removed.


This second example is provided to illustrate the idea a bit further. A+ is again the victim and all the labels are the same as the first example. It also shows that the chains can be quite short.
Interestingly, although B can be a chain of just two cells A must be a longer chain. Otherwise we'd be in a situation where the sudoku has two solutions or multi-colouring can be reduced to a Unique Rectangle.


Type 2 Multi-Colouring
If A+ shares a unit with B+ then any cell with the given candidate and sharing a unit with both A- and B- can have that candidate excluded. The Reason: Since A+ and B+ can't both be true, then either one or both of A- and B- must be true. Therefore any cell sharing a unit with both A- and B- can safely have that candidate excluded.

This is a bit of a mouthful. What we're looking at are cells marked A+ which can see B+ cells but A- cells cannot see B- cells. A+ and B+ both can't be true since they share units in two cases. One or perhaps both of the units marked A- and B- must be true. All cells that can see an A- and a B- can't contain the candidate, in this example number 8. In R3C5 an 8 can see R2C4 AND R8C5. Similarly the 8 in R7C4 can see R2C4 and R8C5/R7C9.


This smaller example might be more easy to understand. The labels are the same so that one A+ can see a B+. There is just one place where a 7 is at the overlap of an A- and a B-.

Advanced-Single Chains

Single's Chains (a.k.a Colouring, Open Chain of Sudo)
Chains form a big part of the advanced strategy armory. Fortunately there is a very simple chain of clues thats works with single candidate numbers only. We can scan the board for a configuration looking at one number at a time.

Let N be our candiate we're scanning the board for. We are looking for pairs of N in any row, column or box. Having three or more won't do and we must ignore units with more than two of N. If we can join a sequence of these pairs we'll form a chain. Obviously the corners of this chain must change from one type of unit to another - for example a pair in a row followed by a pair in a column and then a row again or a box. In the example to the right there are only two 5's at A and B IN THAT ROW. Our first pair. B and C link two 5's in their column. And so on to D
We are hoping to make an odd number of links (the green lines in the diagram). If we do then something very useful occurs.

[Home] - [Personal] - [Sudoku Solver] - Advanced Strategies
Goto Basic Strategies Naked Pairs Naked Triples Naked Quads Hidden Pairs Hidden Triples Hidden Quads Intersection Removal Goto Fishy Strategies X-Wing Sword-Fish Jelly-Fish Multivalue-X-Wing Finned X-Wing Sashimi Finned X-Wing Advanced Strategies on this page Singles Chains a.k.a Simple Colouring Multi-Colouring Y-Wing a.k.a XY-Wing Y-Wing Chain XY-Chains XYZ-Wing WXYZ-Wing Aligned Pair Exclusion Remote Pairs Unique Rectangles Guardian/Broken Wings Death Blossom
Single's Chains (a.k.a Colouring, Open Chain of Sudo)
Chains form a big part of the advanced strategy armory. Fortunately there is a very simple chain of clues thats works with single candidate numbers only. We can scan the board for a configuration looking at one number at a time.

Let N be our candiate we're scanning the board for. We are looking for pairs of N in any row, column or box. Having three or more won't do and we must ignore units with more than two of N. If we can join a sequence of these pairs we'll form a chain. Obviously the corners of this chain must change from one type of unit to another - for example a pair in a row followed by a pair in a column and then a row again or a box. In the example to the right there are only two 5's at A and B IN THAT ROW. Our first pair. B and C link two 5's in their column. And so on to D
We are hoping to make an odd number of links (the green lines in the diagram). If we do then something very useful occurs. Singles Chain Example 1: Load Example or From the start
Pretend for one moment that A is 5. B cannot be which forces C to be 5 which eliminates 5 from D.Now think in reverse.If D is 5 then C cannot be, B must be and A cannot be. Whatever way round you think it through EITHER A OR D must be a 5. Any cell that both A and D can see cannot contain a five - in this case D8 and G3. Since there is a 5 at G3 (marked with X) we can removed it. Have a look at the next strategy for an explanation for cells 'seeing' each other.
As long as the chains are linked by an ODD number of links and there is only two candidates in each unit of each link, this strategy will work. We can describe the two options in this way (~ means NOT 5):
A(5) -> B(~5) -> C(5) -> D(~5) = X(~5)ORA(~5) -> B(5) -> C(~5) -> D(5) = X(~5)

Chains can be any length. In some cases, ridiculously long as in this example. Here twelve cells (A to L) are joined by eleven links to target the cell at G2. The minimum number of links is 3. It will be a rare occasion if you need more than 5.


Another way of looking at this is the popular technique of Colouring. We'll go back to our first example. You assign the start of a promising chain with an arbitary colour, in this case Green (A at D3). Remember, we are only looking at candidate 5 and units with two 5s in them (called conjugate pairs).
A has two conjugate pairs, B and X - which are painted in an alternative colour, blue. From cell B I can find two more pairs at C and E which I colour in green. Both these point to D which must be coloured blue, as well as F along the bottom row.
Now we have arrived at the contradiction. X and D are both blue and they are in the same unit (the row in this case).
Our first rule is: whenever a candidate outside the chain relates by column, row or box to two alternately coloured cells in a singles chain, that 'non-chain' candidate can be excluded. This applies to X.
But not only can we trace a chain from A to D which eliminates the 5 at X but we can say something more general and much more interesting. Either ALL the green cells are 5 or ALL the blue cells are 5. Because we have two blue cells in the same row blue must be false. Green must contain ALL the 5s. That gets us a huge number of cells solved in one go.
Our second rule is: Whenever two cells in a singles chain have the same colour and also share the same unit, that color must be the 'false' color since each unit can only have one of any candidate value.

Finned Sashimi X-Wing Strategy

Finned X-Wing Strategy

Turbo-Fish Strategy

Fishy-Multivalued Xwing

Multivalue X-Wing Strategy

I've named this strategy Multivalue because we're dealing with several candidate values but the formation is exactly as an X-Wing, infact it also follows the generalised x-wing as described above.


Take a look at this rectangular formation made from the yellow and brown cells. Connecting the two yellow cells is a conjugate pair of 6, the only two sixes in the row. In the other row connecting the two brown cells is a conjugate pair of 5. What connects the cells in the columns are the additional candidates, in this case 1 in column 1 and 9 in column 9. Note that there are additional 1's and 9's in these columns. These are the candidates we can eliminate and they are highighted in green cells.

The logic goes as follows: 6 must occur in one of the two yellow cells and the 5 must occur in one of the brown cells. No doubt about that. But both 6 and 5 cannot occur in the same column. Lets pretend they do, say 6 and 5 in column 1. That would leave 9 as the only solution in two cells in column 9. Can't have that. So which ever way round 6 is 5 will be in the opposite column. This forces the 1 and 9 to fill the remaining two corners. If 1 and 9 are guaranteed to be in either a yellow or a brown cell apiece then we can't have any more 1s and 9s in those columns. Hense the eliminations.

The logic goes as follows: 6 must occur in one of the two yellow cells and the 5 must occur in one of the brown cells. No doubt about that. But both 6 and 5 cannot occur in the same column. Lets pretend they do, say 6 and 5 in column 1. That would leave 9 as the only solution in two cells in column 9. Can't have that. So which ever way round 6 is 5 will be in the opposite column. This forces the 1 and 9 to fill the remaining two corners. If 1 and 9 are guaranteed to be in either a yellow or a brown cell apiece then we can't have any more 1s and 9s in those columns. Hence the eliminations.


The generalised X-Wing theory says that we can have a distorted X-Wing starting from 2 boxes and eliminating in 2 rows or 2 columns. This next example does just that. We have a strong link between the yellow cells (B7 and H7) using 5. And another string link between brown cells (A9 and J9). Since the top pair share a box and the bottom pair also share a box we don't need exact row alignment.
Using the arguement above we know that one 5 or 3 will occur in B7 or A9 focing the other cell in the top right box to be a 2. We don't know which yet, but of those two cells will be a 2 so all the others in the box can go.

Likewise, a 5 or a 3 will appear one of the cells int the bottom box, H7 or A9. That forces 4 to be the solution to that pair - we just don't know which way round yet. The 4 in H8 can go.

Eliminations such as these can be achieved using Nice Loops and other very advanced strategies but this is well worth looking out for separetely since its both easier to spot and extends the elegance of the familiar X-Wing.

Fishy-Squirm Bag

Squirm-Bag
Jelly-Fish can be extended to five rows and columns. It's been named Squrim-Bag. I know of no necessary example in a solving sequence and thanks to Florian Fischer for explaining why.
Let's take the Jelly-Fish example above. Columns 2,4,6,8 are such that the 4's are restrained to rows 1,5,7,9. The 4 in each column must be placed in one of these rows, and therefore they must occupy all of them and within the yellow cells. So the 4's in rows 1,5,7,9 cannot appear in columns 1,3,5,7,9.
What are we saying? 4's in columns 2,4,6,8 are restricted to rows 1,5,7,9. That is equivalent to saying that there is no 4 in the intersection of columns 2,4,6,8 and rows 2,3,4,6,8. And that is equivalent to say that 4's in the five rows 2,3,4,6,8 are restricted to the five columns 1,3,5,7,9. And that describes a Squirm-Bag. Indeed, you can conclude that the five 4's must occupy all columns 1,3,5,7,9 within rows 2,3,4,6,8 and therefore the 4's in columns 1,3,5,7,9 cannot appear outside of these rows, that is in rows 1,5,7,9.
Generally, a size-N fish has a size-(9-N) fish counterpart. You just need to complement the set of rows and the set of columns and reason the other way round (column-wise or row-wise). Both are equivalent. Therefore you don't need to go further than size 4 Jelly-Fish in a standard 9x9 Sudoku.

Fishy-JellyFish

Jelly-Fish Strategy
Jelly-Fish extends Swordfish one further row and column. We are looking for either
1: four rows such that, in total, four cells are occupied in the row by a candidate number; or 2: four columns such that, in total, four cells are occupied in the column by a candidate number If this configuration is found then we can look in the opposite direction (if by row then down the column, if by column then across the row. If any candidates are found they can be eliminated. After the elimination both conditions above will hold.


How does it work? Pick any yellow cell in the example above that contains a 4. Keeping an eye on it. Pretend the solution actually is a 4. All others 4s in the row and columns are repressed. What we're left with is a Sword-Fish. The Sword-Fish logic then applies. Pick any 4 in the Sword-Fish and it reduces to an X-Wing. Since any combination of 4s on the grid are possible there is no room for 4s outside the grid - that align on the grid rows and columns.

Fishy-SwordFish

Sword-Fish Strategy With X-Wing we looked at a rectangle formed by four numbers at the corners. This allowed us to exclude other occurrences of that number in either the row or column. We can extend this pattern to nine cells connected by locked pairs. In the example below (concentrating on the number 5) we have three sets of locked pairs at AB, CD and EF. They are all horizontal pairs but they also lock each vertically in a staircase fashion (I guess this inspired the name).

The vertical pairing is between AF, BD and CE. Now, in this example we can clearly see that the green horizontal lines connect pairs of 5. Because 5 is also locked vertically the red lines represent columns where if a 5 is not on our grid of nice nodes it can be excluded. There is one such 5 on cell X (E2).
Another way of looking at it is to consider any 5 on the Sword-Fish grid. Pretending for a moment its a real 5 the others in the row and column are repressed. What we're left with is an X-Wing

Fishy-XWing

X-Wing Strategy
This strategy is looking at single numbers in rows and columns. It should be easier to spot in a game as we can concentrate on just one number at a time. The rule is
When there are
1: only two possible cells for a value in each of two different rows, 2: and these candidates lie also in the same columns, then all other candidates for this value in the columns can be eliminated. The reverse is also true for 2 columns with 2 common rows


The above picture shows a classic x-wing, this example being based on the number six. The X is formed from the diagonal correspondence of squares marked A, B, C and D. What's special about them? Well, A and B are a locked pair of 6's. So is C and D. They are locked because they are the only 6's in the first and last rows. We know therefore that if A turns out to be a 6 then B cannot be a 6, and vice versa. Likewise if C turns out to be a 6 then D cannot be, and vice versa.
What is interesting is the 6's present in the two columns 6 and 9 directly between A and C and B and D. These have been highlighted with red boxes. Think about the example this way. A, B, C and D form a rectangle. If A turns out to be a 6 then it rules out a 6 at C as well as B. Because A and CD are 'locked' then D must be a 6 if A is. Or vice versa. So a 6 MUST be present at AD or BC. If this is the case then any other 6's along the edge of our rectangle are redundant.
We can remove the 6's marked in the cyan squares. This is good news because this leaves only a 9 at G9 and we can complete.
This strategy works in the other direction as well. If we had two pairs in two columns and those four numbers shared two rows, then we can eliminate any other occurrences of those numbers on the same rows.
Generalising X-Wing
X-Wing is not restricted to rows and columns. We can also extend the idea to boxes as well. If we generalise the rule above we get:
When there are
1: only 2 candidates for a value, in each of 2 different units of the same kind, 2: and these candidates lie also on 2 other units of the same kind, then all other candidates for that value can be eliminated from the latter two units.
Now we have 6 combinations: 1: Starting from 2 rows and eliminating in 2 columns Classic X-Wing 2: Starting from 2 columns and eliminating in 2 rows Classic X-Wing 3: Starting from 2 boxes and eliminating in 2 rows Same effect as line/box reduction 4: Starting from 2 boxes and eliminating in 2 columns Same effect as line/box reduction5: Starting from 2 rows and eliminating in 2 boxes Same effect as pointing pairs 6: Starting from 2 columns and eliminating in 2 boxes Same effect as pointing pairs
Here is an example of combination 5. Starting from 2 rows and eliminating in 2 boxes, in this case the last two boxes in the Sudoku. The rows are 7 and 8 and they each have two 7s. Our x-Wing is now a trapeziod but the logic is the same. We can be certain that 7 can be elminated at X, Y and Z.

But HOLD UP one moment. There is a simpler strategy that does the same job!

A and B above are a pointing pair. This removes the same 7s in the same place. Combination 6 is also the complement of a pointing pair. Combinations 3 and 4 are also complements of the Line/Box Reduction. Our generalization of X-Wing to boxes hasn't profited us at all. We learn that
X-Wings containing boxes are the inverse of the Intersection Removal strategies

Basic-Intersection Removal

Intersection Removal If any one number occurs twice or three times in just one unit (any row, column or box) then we can remove that number from the intersection of another unit. There are four types of intersection:
1:A Pair or Triple in a box - if they are aligned on a row, n can be removed from the rest of the row. 2:A Pair or Triple in a box - if they are aligned on a column, n can be removed from the rest of the column. 3:A Pair or Triple on a row - if they are all in the same box, n can be removed from the rest of the box. 4:A Pair or Triple on a column - if they are all in the same box, n can be removed from the rest of the box.
Rules 1 and 2 are also called Pointing Pairs/Triples Rules 3 and 4 are also called Box/Line Reduction
Type 1 - Pointing Pairs/Triples Strategy (a.k.a. Intersection Removal) Looking at each box in turn there may be two or three occurrences of a particular number.If these numbers are aligned on a single row or column (as a pair or a triple) then we know that number MUST occur on that line. Therefore, if the number occurs anywhere else on the row or column outside the box WHICH THEY ARE ALIGNED ON then it can be removed. The pair or triple points along the line at any numbers which can be removed.

Consider the lower third of the puzzle board above. We are looking at the number 7 in the center box. It can only be found in the top row at A and B. The 7 at Z in the left hand box can be removed. Following on from this discovery it means the 7 in the last row must be in column 2 (where it currently says 5/7).
Type 2 - Box Line Reduction Strategy (a.k.a. Intersection Removal) This strategy involves careful comparison of rows and columns against the content of boxes (3 x 3 squares). If we find numbers in any row or column that are grouped together in just one box, we can exclude those numbers from the rest of the box. For example:

Consider the right hand box in this center row of the board. We can see five squares with 9s marked as possible numbers. The 9s that exist in cells A and B are the only 9s in that whole row. Either A or B MUST contains a 9 in the final solution. We can therefore safely remove the 9s from C, D and E.
Credits

Basic-Hidden Quads

Hidden Quads
Here is the one example of a Hidden Quad found in a library of 18,000. Four numbers 3/5/6/7 on four cells are hidden by all of one number - 4 in R2C8. Barely qualifies as 'hidden' but it is legitimate. Note how none of the cells need to have all four numbers as long as only four cells contain all four numbers and are intermingled.

Basic-Hidden Triples

Hidden Triples
We can extend Hidden Pairs to Hidden Triples or even Hidden Quads. A Triple will consist of three pairs of numbers lying in three cells in the same ROW, COLUMN or BOX, Such as 4/8/9, 4/8/9 and 4/8/9. However, we don't need exactly three pairs of numbers in three cells for the rules to apply. In the example below we have 4/8/9, 4/8 and 8/9 in three cells.

Since 4 AND 8 AND 9 must exist in those three squares the other numbers cannot exist there. So we remove them. This reveals the hidden triple:

The minimum number of numbers for Hidden Triples will be three pairs of numbers, for example, 4/8, 4/9 and 8/9. It is clear they are bonded together and if they lie on three cells within the same ROW, COLUMN or BOX then any other numbers on those cells can be removed.