Sunday, February 11, 2007

Advanced-Remote Pairs

Remote Pairs
I've coined Remote Pairs to distinguish this new strategy/test/check, whatever, from the simpler more obvious pairs. Since first writing about it the strategy has been expanded in several directions and is more common than first thought. Pairs occur where two or more squares have the same two possible numbers. A locked pair is two such squares which lock each other in. For example, in the diagram on the right in the top row: 6 and 9 occur twice (labelled A and B) as a pair on the same row. This means the number 6 and the number 9 MUST occur in both squares. We can therefore eliminate other 6s and 9s from the same row. Same rule applies to boxes and columns.

On the diagram on the right I have marked all locked pairs with a red line. These are AB, AC, BD, CD and DE. You can load and view the whole of this board from the main Sudoku page. Look for Remote Pair Test in the drop downlist of examples. The point of this test/strategy is that we want to eliminate the 9 from square Z and leave the 8. Can we do this logically, or must we guess? What about square X which also looks like a candidate for removing the 6 and 9?
To do this we must prove that A and E are themselves a locked pair. But how can we do this when they are not in the same row, column or box? We must also prove that B and E are NOT a locked pair, otherwise we'd have to remove the 6 and 9 from X as well. Visually we can see that if B is a 6 then D must be a nine so that E must be a 6. B and E are complementary pairs since they MUST have the same number, be it 6 or 9. Likewise A and D.
Consider Figure 1. We have five squares with the same pairs of numbers. Arranged in a pentagram as a network diagram each square has four links to every other square.I have drawn in red the links between locked pairs and ignored all other links. Let us say these links have a distance of 1 between the nodes.

Now, in figure 2, we map all the pathways of distance 2. Valid pathways must be along the routes defined in Figure 1. What we are mapping here is all the complementary pairs, and I've drawn the links green. Topologically there cannot be ANY red links matching two locked pairs with distance 2.

In figure 3, we are mapping all the possible pathways of distance 3. These paths represent connections between newly discovered locked pairs. There are only two possible paths in this example, and again they can only be between locked pairs at this distance.
If we had more nodes we could carry on like this and look for distance 4 paths representing new complementary pairs but distance 4 is not possible in this example.


However, we now know that we can show that AE is a locked pair if we can show that its minimum distance is an odd number (or distance mod 2 = 1 in arithmetical terms). They become a special locked pair I call a remote pair. Thus we may safely remove the 9 from Z. Because the distance between BE is an even number (2) we know we have a complementary pair and the information is useless for deciding the fate of X. Its important to remember numbers can be removed from any cell that both ends of the chain can see, so consider boxes as well as rows and columns.
Now the problem has been generalised we may proceed to code the rule into an algorithm. Test 9 on the solver page is the result.


Lets look at another example. This looks complicated because we have seven pairs (marked A,B,C,D,E,F and G). Our targets are X and Z which can be got at by an attack from AD and AG.
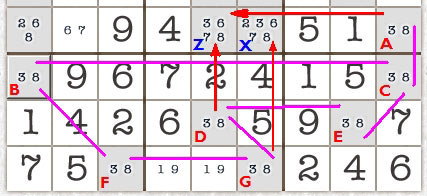
We would like to remove the 3 and 8 from Z and X. However, it is only safe to remove the numbers from Z. Why? Because AD is an odd number of locked pairs from each other (ACED or ACBFGD) . AG, whether you go via ACBFG or ACEDG are even numbers apart
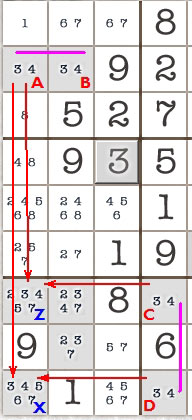
A word of warning though. It is essential that the line of attack is supported by a contiguous line of locked pairs. In the example on the right we have four pairs of 3/4 at A,B,C and D. However, while AB is connected and so is CD, there is no connection between the two groups. Therefore the elimination of the 3/4s on Z and X are not legal or logical.


Go To : Basic ||Fishy || Advanced
Go To : Sudoku solving techniques

Saturday, February 10, 2007

Advanced-Aligned Pair Exclusion

Aligned Pair Exclusion (APE)
This is an interesting strategy since it overlaps with Y-Wings and XYZ-Wings but uses very different logic. APE logic will solve an XY-Wing (3 bi-values) and an XYZ-Wing (bi-value <-> tri-value <-> bi-value).There are two types of APE - the normal APE and Extended APE.
Aligned Pair Exclusion - Type 1

The Aligned Pair Exclusion can be succinctly stated: Any two cells aligned on a row or column within the same box CANNOT duplicate the contents of any two-candidate cell they both see. The Y-Wing strategy has some diagrams (see Figure 2) to show how cells can see other cells along the row, column or box and how they intersect or overlap. In Figure 1 X and Y are two cells and the yellow shading shows the common cells they can both 'see'.
Lets consider all the possible pairs of numbers in X and Y. These are:
3 and 2 (in X and Y)3 and 55 and 25 and 57 and 27 and 5

Now is obvious that 5 and 5 can't be a solution to X and Y. If any of the other pair solutions were true we'd be able to remove those solutions from the candidates in all the other yellow squares. The strategy asks us to look at all the bi-value cells X and Y can 'see'. Cells marked A, B and C containing 2/7 and 3/5 and 5/7 match some of the options we have for X and Y. Any of these pairs would remove ALL candidates from one of A, B or C which is illogical, captain. This means we can exclude them from possible solutions for X and Y. This leaves us with a shorter list: 3 and 2 (in X and Y)5 and 2
What are we left with? According to our new list Y can only take the value 2 so we can remove 5.We can also remove the 7 from X. This helps us solve the Sudoku.
Credits - Rod Hagglund first popularised this method. A good thread with a double example and walk-through is here


Aligned Pair Exclusion - Type 2
The Extended Aligned Pair Exclusion includes tri-values spread over two cells as part of the attack. APE 2 Says that any two cells with only abc excludes combinations ab, ac and bc from the pair under consideration. This example is very clear since the two-cell tri-value is convieniently 4/5/6 in both cells. (see next example for alternative tri-value formations).
Lets consider all the possible pairs of numbers in X and Y first. These are:
1 and 4 (in X and Y)1 and 61 and 84 and 4 (impossible)4 and 64 and 86 and 46 and 6 (impossible)6 and 8

Cell R5C6 marked C removes a 1/4 pair. Now the tri-value: These are 4/5, 4/6 and 5/6. Removing these from the possibles for X but Y leaves us:
1/4/6 remains in X but Y is reduced to 6/8. Why should this work? Well, 5 is not really part of the tri-value that effects our APE. The key combination is 4/6 and that does the damage. Pretend that X is 4 and Y is 6 (or the other way round). This would leave A and B both equalling 5. Thats illegal which is why 4/6 is a combination we can remove from possible pairs in X and Y.
1 and 6 (in X and Y)1 and 84 and 86 and 8


In this second example the tri-value contained in A and B is 2/7/8. The only common value is 2. Nevertheless, the abc combinations are 2/7, 2/8 or 7/8. All the possible pairs of numbers in X and Y are. 7 and 5 (in X and Y)7 and 98 and 58 and 78 and 9
Our one tri-value which matches these is 7/8. If we remove 7/8 from our list Y is reduced to 5 and 9. We get a naked pair and the rest of the Sudoku solves.

Advanced-Wxyz Wing

WXYZ-Wing (a.k.a. "Extended Quad")
This is an extension of XYZ-Wing that uses four cells instead of three. Each possible value of the hinge cell results in a Z value in one of the cells in the WXYZ-Wing pattern, thus leaving no room for a Z on any cell all four can 'see'.

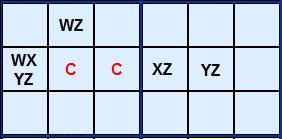
Its name derives from the four numbers W, X, Y and Z that are required in the hinge. The outer cells in the formation will be Wz, XZ and YZ, Z being the common number.


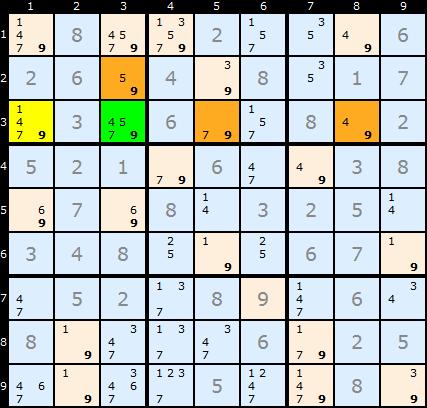
In this example our four-value hinge is R3C3 marked in green. The three outlier cells, marked in orange each contain a 9 (our Z) plus one other number unique to themselves and the hinge. It's important that these extra numbers really are common only to the hinge and there are no pairs like 5/9 and 5/9 in two of the orange cells. There is only one cell that all four of the WXYZ can see - R3C1, marked in yellow. It has a 9 which can be removed. No matter what number is the final solution in the hinge, one of the WXYZ must be a 9.